Saturday, June 25, 2011

Peanut Candy Bar Treats

One of my favorite candy bars are paydays. I love the sweet and salty combo. I think that's why I love these treats so much, they taste a lot like a payday.

I have always made them with peanuts and peanut butter chips, but I've also made a batch with cashews and butterscotch chips for Tyler who can't have peanuts. They were so good! I'm not sure I can pick a favorite. I guess you'll just have to try them both ways.


1 box of yellow cake mix
1/3 cup plus 1/4 cup melted butter or margarine, divided
1 egg
3 cups mini marshmallows
1 cup light corn syrup
1 1/2 cups peanut butter chips or butterscotch chips
3 teaspoons vanilla
3 cups rice crispy cereal
3 cups salted peanuts or salted cashews


Preheat oven to 350. Beat cake mix, 1/3 cup melted butter and egg in a medium bowl. Press mixture into an ungreased 9x12 glass baking dish. Bake until lightly browned, about 12 minutes. Sprinkle on your marshmallows and bake for another 10 minutes or until marshmallows are all puffy. Let cool.


Combine corn syrup, remaining butter and peanut butter chips in a large saucepan. Cook over medium heat, stirring frequently, until chips are melted, about 5 minutes. Stir in your vanilla. Add the cereal and peanuts, mix well. Spread over slightly cooled marshmallows. Cool completely before cutting into bars. Store in an airtight container.


Delicious!

Tuesday, June 21, 2011

Surprise Cookies


Surprise Cookies

Ingredients

  • 1 3/4 cups all-purpose flour
  • 3/4 cup cocoa powder
  • 1/2 teaspoon baking soda
  • 1/2 teaspoon salt
  • 1/2 cup (1 stick) unsalted butter, softened
  • 1 cup sugar
  • 1 large egg
  • 1/2 cup milk
  • 1 teaspoon pure vanilla extract
  • 12 large marshmallows, cut in half horizontally
  • Chocolate Frosting for Surprise Cookies  (I used store bought frosting)

Directions

  1. Preheat oven to 375 degrees. In a medium bowl, whisk together flour, cocoa powder, baking soda, and salt; set aside.
  2. In the bowl of an electric mixer fitted with the paddle attachment, cream together butter and sugar until light and fluffy, about 2 minutes. Add egg, milk, and vanilla, and beat until well combined. Add reserved flour mixture; mix on low speed until combined.
  3. Using a tablespoon or 1 3/4-inch ice cream scoop, drop dough onto ungreased baking sheets, about 2 inches apart. Bake until cookies begin to spread and become firm, 10 to 12 minutes.
  4. Remove baking sheets from oven, and place a marshmallow, cut-side down, in the center of each cookie, pressing down slightly. Return to oven, and continue baking until marshmallows begins to melt, 2 to 2 1/2 minutes. Transfer cookies to a wire rack to cool completely before frosting.
  5. Spread about 1 tablespoon of frosting over each marshmallow, starting in the center and continuing outward until marshmallow is covered.

    (From marthastewart.com)

Thursday, June 16, 2011

Broccoli Slaw Salad

Yum.

If your looking for an easy, light salad for a summer get together, this is it! It is one of our favorites!


1 pkg. Broccoli slaw (found by the bagged salad in the produce section)
2 or 3 stalks of green onions, chopped
sunflower seeds
sliced almonds
2 pkgs. chicken flavored Ramen noodles (it has to be the chicken, I tried the beef flavored once & it was awful!)
crasins


Dressing
2 chicken seasoning packets from the Ramen noodles
1/3 cup vinegar
1/2 cup sugar
1/2 cup vegetable oil


*Smash the Ramen Noodles, them mix with the broccoli slaw. Sprinkle the green onions, sunflower seeds, almonds & crasins onto the Broccoli slaw & mix together. Now I know there are no exact measurements for those last three ingredients, it's because some people like their salad stuffed (me) while others would prefer the taste of the Broccoli slaw to be the main thing (my hubby). So add the ingredients slowly until you find your perfect combination. Set aside.

*In a separate bowl, mix the chicken seasoning, vinegar, sugar & oil together. Pour the dressing mixture slowly over the noodle mixture. BE CAREFUL not to dump the entire dressing mixture on all at once, I don't like my salad drenched so I add it slowly while mixing just until it's coated. Most of the time I don't use all of the dressing. Mix well & serve immediately.

DELIGHTFUL!!

Friday, June 10, 2011

Double-Decker Fudge


Double-Decker Fudge
1 cup REESE'S® Peanut Butter Chips
1 cup Semi-Sweet Chocolate Chips or HERSHEY'S MINI CHIPS Semi-Sweet Chocolate
2 1/4 cups sugar
1 jar (7 ounces) marshmallow creme
3/4 cup evaporated milk
1/4 cup (1/2 stick) butter or margarine
1 teaspoon vanilla extract

Line 8-inch square pan with foil, extending foil over edges of pan. Measure peanut butter chips into one medium bowl and chocolate chips into second medium bowl. In heavy 3-quart saucepan, combine sugar, marshmallow creme, evaporated milk and butter. Cook over medium heat, stirring constantly, until mixture boils; boil and stir 5 minutes. Remove from heat; stir in vanilla. Immediately stir 1/2 of hot mixture (1 1/2 cups) into peanut butter chips until chips are completely melted; quickly pour into prepared pan. Stir remaining 1/2 of hot mixture into chocolate chips until chips are completely melted. Quickly spread over top of peanut butter layer. Cool; refrigerate 1 1/2 hours or until firm. Remove from pan; place on cutting board. Peel off foil; cut into 1-inch squares. Store tightly covered in refrigerator.


Makes about 5 dozen pieces or about 2 pounds candy

Peanut Butter Fudge: Omit chocolate chips; place 1 2/3 cups (10-ounce package) Reese's® Peanut Butter Chips in large bowl. Cook fudge mixture as directed above; add to chips, stirring until chips are completely melted. Pour into prepared pan; cool to room temperature.

Thursday, June 9, 2011

cherry brown butter bars

It's cherry season!


We went to my Mom's house and picked baskets of cherries. When I came home I immediately hopped online to see what I could make with these delicious fellas. I found this recipe on SmittenKitchen and loved it so much that I made it twice. The second time I changed it up a bit. You see, I love cherries and almonds together. So I substituted half of the vanilla extract with almond extract and ground up some almonds to use in place of half the flour. So so so amazing! One more thing I changed the second time around, I thought it needed more cherries, so I covered the crust with them. It really just depends on you.


Here's what you'll need for the crust:


7 tablespoons unsalted butter, melted


1/3 cup sugar


1/4 teaspoon vanilla extract (or 1/8 vanilla and 1/8 almond)


1 cup plus 1 tablespoon flour (or 1/2 cup finely ground almonds and 1/2 cup + 1 tablespoon all-purpose flour)


pinch of salt


And for the filling you will need:


1/2 cup sugar


2 large eggs


pinch of salt


1/4 cup all-purpose flour


1 teaspoon vanilla (or 1/2 vanilla and 1/2 almond)


1/2 cup (1 stick) unsalted butter, diced


2-3 cups of sliced, pitted cherries


First you need to make the crust. Preheat the oven to 350. Line a 8x8 pan with foil, set aside. In a medium bowl mix together your melted butter, sugar and vanilla. Add the flour and salt and stir well. Press mixture into the bottom of your prepared pan. Bake for 17 minutes or until golden brown. Let cool a bit on a wire rack.


While your crust is baking you need to brown your butter. By the way, brown butter is sooooo good! It tastes a little nutty. I love it! So, to brown it you'll need to cook your butter in a small saucepan. A lighter colored one is best so you can see the color of the butter change. Cook it over medium heat stirring often and watching it closely. It'll take about 6 minutes to brown. Once brown, immediately pour it into a glass measuring cup to cool slightly.


Now you need to whisk your eggs, sugar and salt in a medium bowl to blend. Add flour and vanilla and whisk until smooth. Slowly whisk in your browned butter into your egg mixture. Whisk until smooth. It should look something like this....


Did you notice the cherries in the photo above? Not enough for me, I added another cup to that. Arrange your cherries on your slightly cooled crust. Carefully pour on your browned butter mixture over your cherries. Bake for about 35-40 minutes or until toothpick comes out clean. Cool your bars before removing from pan and cutting into squares. They should look something like this (but with more cherries)....
Check out that shortbread crust and speckles of browned butter. Heaven.

Tuesday, May 31, 2011

Whole Wheat Apple Muffins

Breakfast, it's the best!

And it's even better with these....

They are so full of apples and cinnamon-y goodness.
recipe from smittenkitchen.com

1 cup whole wheat flour

1 cup all-purpose flour
1 teaspoon baking powder
1 teaspoon baking soda
1/4 teaspoon salt
1 tablespoon cinnamon
1/2 cup unsalted butter, at room temp.
1/2 cup granulated sugar
3/4 cup packed brown sugar, divided
1 egg

1 cup buttermilk or plain yogurt
3 apples, peeled, cored, and chopped small

Preheat oven to 450. Grease 18 muffin cups and set aside. Mix together flours, baking powder, baking soda, salt and cinnamon and set aside. In a mixing bowl, cream the butter. Add sugar and 1/4 cup of the brown sugar. Beat until fluffy scraping down the sides of the bowl as needed. Add the egg and mix well. Mix in the buttermilk gently so it doesn't start to curdle. Stir in your dry ingredients and fold in your apples.
Pour it all into your muffin cups. Sprinkle on the remaining 1/2 cup brown sugar. Bake at 450 for 10 minutes, turn down the heat to 400 and bake for another 5-8 minutes or until toothpick comes out clean. Cool them a little before serving, those apples get super hot!

Monday, May 23, 2011

Pumpkin Roll

This recipe comes from my Grandma Lucy's cookbook. She put this cookbook together for her kids years ago with all of her recipes from over the years (she was the best cook/chef/baker I have ever known). That's what my grandma did, worked as a cook/chef & also owned her own bakery. My mom made all of her kids a copy & it is one of my most treasured possessions. I remember Grandma Lucy making these pumpkin rolls when I was little & it was my first time trying it. It turned out perfect! Just like I remembered! (Sorry for the trip down memory lane!)

3 eggs
1 cup sugar
2/3 cup canned pumpkin
1 tsp. lemon juice
3/4 cup all purpose flour
1 tsp. baking powder
2 tsp. cinnamon
1/2 tsp. nutmeg
1 tsp. ginger
1/2 tsp. salt

Beat eggs for 5 minutes, gradually beat in sugar. Stir in pumpkin and lemon juice. Sift flour, baking powder, cinnamon, nutmeg, ginger and salt together. Fold into pumpkin mixture. Spread onto a greased and floured cookie sheet. (I sprayed mine with the non-stick spray that has flour in it & it worked great). Bake in preheated 375 degree oven for 15 minutes. Do not overcook!

This is what mine looked like after I pulled it out of the oven.
Filling:
2 cups powdered sugar
8 oz. cream cheese
1/4 cup butter softened
1 tsp vanilla extract
Beat filling ingredients together (I did this while my pumpkin roll was in the oven).
DELICIOUS!
Sprinkle a dish towel with some powdered sugar. When cake is removed from oven, turn it out onto the towel and sprinkle with more of the powdered sugar. (Make sure you sprinkle the towel well so that your roll doesn't stick.) Roll in towel and cool in freezer for 10 to 15 minutes.
Unroll cake and spread with filling. Re-roll and wrap in wax paper. (If your roll does stick to the towel, let it sit for a minute & warm to room temperature. Then add a little flour to the roll before putting it in the wax paper.) Store in refrigerator. Serves 8-10.
You just cut thick slices off of the roll. It is so delicious! Even my husband who is not a fan of cream cheese frosting loved it! YUMMY!

Friday, May 20, 2011

Snickers Bars

It looks like a stuffed brownie and tastes like a really amazing stuffed brownie. That's what confuses me. How is it that when you take a chocolate cake mix and add butter and sweetened condensed milk does it somehow transform into a brownie and no longer a cake? But it is still a cake that tastes like a brownie. Have I confused you yet?


My Wayne loves snicker bars! So when I came across this recipe I immediately thought of him. Of course, they don't really taste like a snickers bar. They just have the same goodies inside. You know, like the caramel and peanuts and chocolate..... Heaven!


1 box chocolate cake mix


3/4 cup melted butter


1 can sweetened condensed milk


1 (14 oz) package of caramels found in the candy isle


1 cup peanuts


1 cup milk chocolate chips


Mix the chocolate cake mix with melted butter and 1/3 cup of the sweetened condensed milk. It will be super thick. Spread 2/3's of this mixture into the bottom of an ungreased 9x13 pan. Bake at 350 for 7 minutes.


Meanwhile, unwrap the caramels and put in a microwave safe bowl. Add 1/3 cup of the sweetened condensed milk and microwave for 1 minute. Stir. Microwave for 45 seconds. Stir. Microwave for 30 second or so until the caramel mixture is super smooth.


Sprinkle the chocolate chips on the hot cooked cake mixture as soon as it comes out of the oven. Pour on the caramel sauce as evenly as you can. Next comes the peanuts. Make it pretty. The last layer, drop on the remaining cake mixture. Oh wait! Remember how we only used 2/3 cup of the sweetened condensed milk? Well, I'm not a fan of wasting. So I tossed the rest of the can into the remaining cake mix mixture. It made it a little thinner for the top layer. Then I made sure to lick that can clean as well as the spoon. I LOVE SWEETENED CONDENSED MILK!


Okay, now bake it for another 16-18 minutes.


MAKE SURE YOU LET IT COOL BEFORE CUTTING! The caramel needs time to harden a little. So just be patient and drool over it for about 2 hours.


Enjoy your brownie-like-deliciousness!


Wednesday, April 27, 2011

Pastel Easter Candies

1/4 cup granulated sugar
Food coloring of choice
1/4 cup butter, softened
4 ounces regular cream cheese, softened
1 teaspoon flavor extract of choice*
4 cups powdered sugar (1 pound)
2 1/2 cups shredded sweetened coconut (7 ounces)

Place 1-2 Tbsp granulated sugar in a small bowl, add a small drop of food color and stir to thoroughly mix and color the sugar. If color is too dark, add additional sugar. If color is too light, add more food coloring. *For fun, create a variety of colored sugars to match the extract flavoring used (yellow for lemon, orange for orange flavor, etc) Can also use Almond extract.

Soften butter and cream cheese, add flavor extract of choice* and powdered sugar; stir to blend. Add coconut and mix well (using clean hands or cookie dough attachment on a stand mixer).

Roll candy into small egg shapes then roll in colored sugar; place candy on a cookie sheet to set up. This is fun for the kids to help make! I will add a picture very soon!

Friday, April 15, 2011

Sugar Cookies

You know how some sugar cookies need frosting because they taste pretty much like flour? Well, these cookies stand alone. No frosting needed at all.

They are perfect!


This recipe came from my Great Grandma Genevieve Gilder that my little Genevieve was named after.

1 cup vegetable oil

1 cup butter, at room temperature

1 cup granulated sugar

1 cup powdered sugar

2 teaspoons vanilla

1 teaspoon cream of tartar

1 teaspoon baking soda

2 eggs

4 1/2 cups flour


With a mixer beat oil, butter, sugars, vanilla, cream of tartar, baking soda, and eggs until fluffy. Add flour. Refrigerate for at least an hour. Form dough into 1-inch balls, roll in sugar and place on ungreased cookie sheet. Press balls down slightly with a glass cup dipped in sugar. Bake at 350 for 8 minutes or so. The tops will not brown at all, but my bottoms did when I left them in too long, so watch them carefully. Cool on a flat surface.


And then I got creative...


This black raspberry ice cream from Dreyers is amazingly refreshing!

You know what else would be cuter? If I added a little sprinkles on the chocolate before it hardened. Or better yet, just use colored chocolate like yellow or pink or light blue. How Easter-ish would that look?!

Have fun. Get creative.

Wednesday, April 13, 2011

Triple Chocolate Oreo Bars

I found this on the blog: cookies and cups, this is a great blog for dessert/treat ideas!!! I made this at bunko for our dessert and it is super yummy!!!

1 16.6 oz pkg of Oreo cookies
1 stick (1/2 cup) butter, melted
1/4 teaspoon salt
1 (14 ounce) can sweetened condensed milk
1 teaspoon vanilla extract
1 cup semi-sweet chocolate chips
1/2 cup milk chocolate chips
1/2 cup mini chocolate chips
1 cup white chocolate chips, melted

Preheat the oven to 325°
Line a 9 x 13 pan with foil (shiny side down) and spray with non-stick spray.
Set aside 8 Oreo cookies.
Crush the remaining Oreos with either your food processor or in a ziplock bag with a rolling pin. (I did the ziplock method)
When the Oreos are crushed transfer them into a medium bowl and add your salt and melted butter, stirring to combine.
Press your Oreo mixture into your prepared pan.
Chop your remaining 8 Oreos into coarse pieces and set aside.
In a double boiler (a bowl fitted over a pan of boiling water) add your sweetened condensed milk, the semi-sweet chips, the milk chips and the vanilla. Stir until all melty.
(OR you could do this in the microwave, stirring every 30 seconds until melted, I did it this way!)
Remove from heat
Pour your melted chocolate mixture over the Oreo crust.
Sprinkle the mini chocolate chips and the Oreo cookies chunks over the top of the filling.
Press down gently into the chocolate topping.
Bake for 20-22 minutes in preheated oven.
Cool pan on a wire rack for approx 1 hour.
Melt the white chocolate chips.
Drizzle the white chocolate over the top of the bars.
Chill in refrigerator until completely cooled, an hour or two.
Make sure they are completely cooled, otherwise they are a bit mushy...still delicious, but hard to cut.
When ready to serve, using the foil remove from the pan and cut into squares.
Enjoy the rich chocolatey taste!!! mmmmmmmm!


Wednesday, April 6, 2011

Grapefruit Cake

I cringed as soon as I saw my Bountiful Basket a few weeks ago. Two grapefruits? Really? Who really likes grapefruit anyway? I can't imagine any reason to eat one....until now.


This cake reminds me of a cake my mom makes for my brother, Brian. She uses orange juice in it then pokes the top after it's baked to pour on this amazing citrus glaze. Oh man...delicious!


The best part about this cake? It tastes nothing like a grapefruit. It just tastes citrus-y. It's quite refreshing.


Cake:

2 cups all purpose flour

1 1/2 teaspoons baking powder

1 teaspoon salt

1 2/3 cups sugar

2 eggs

1 cup milk, not skim - you need that fat in there!

3/4 cup vegetable oil

1 tablespoon grapefruit zest

1 teaspoon vanilla


Grapefruit Syrup - Oh yum!:

1 cup strained fresh grapefruit juice

2/3 cup sugar


Grapefruit Icing:

3/4 cup powdered sugar

1 tablespoon or so fresh grapefruit juice


Preheat oven to 350. Spray a 10x4 inch loaf pan with cooking spray.

Combine the flour, baking powder, and salt in a small bowl; set aside.

In a mixing bowl, combine sugar and eggs with an electric mixer. Mix for about 3 minutes. Be patient....you won't regret it! Add the milk, oil, zest and vanilla. Mix well. Slowly add in the dry ingredients. Pour it all into your prepped pan. Bake for an hour and ten minutes or until toothpick comes out clean.


While it's baking make the syrup. Combine the juice and sugar in a small saucepan. Cook over medium-high heat until all the sugar has dissolved. Let cool a little.


As soon as the cake comes out of the oven take a skewer and poke lots of holes about an inch deep into the top of the cake. Pour on your syrup.


Now, you have got to let it cool before removing or slicing ! or else you will have a cake that looks a lot like this....


Not pretty at all, but oh my goodness, it tastes amazing!


One last thing, make your icing. Just stir together your powdered sugar and juice. Add more juice if needed and pour it all over the top. My mouth is salivating.


So, now I will no longer make a face when I spot those huge grapefruits in my basket. I'll actually smile because they'll give me an excuse to make this cake again.

Tuesday, March 22, 2011

Peanut Butter Truffle Brownies

These should be made with a warning, because they are fattening, unhealthy, so rich & soooo delicious! A lady in our ward brought us a plate of them & I had to get the recipe! Hers were so much prettier than mine (all of her layers were smooth & even), but I guess that comes with practice!

Brownie Base
1 box Betty Crocker Original Supreme brownie mix (this is the kind I used, but I think any boxed chewy brownie mix would work just fine).
water, vegetable oil and eggs called for on brownie mix

Filling
1/2 cup butter (yes it says a half cup of butter just for the filling)
1/2 cup creammy peanut butter
2 cups powdered sugar
2 teaspoons milk

Topping
1/4 cup semisweet chocolate chips (I used milk chocolate chips because we are not semisweet at our house. Whatever floats your boat!)
1/4 cup butter (why yes that does say another one-fourth a cup butter just for the topping! Go big or go home!)

Heat oven to 350 degrees. Grease bottom only of 13x9-inch pan with cooking spray or shortening. (I lined my pan with aluminum foil & sprayed the bottom of it. It made it easier at the end to cut the brownies because I just lifted them right out of the pan and I didn't have to wash the pan!)
In medium bowl, stir brownie mix, pouch of chocolate syrup, water, oil and eggs until well blended. Spread in pan. Bake 28 to 30 minutes or until toothpick inserted 2 inches from side of pan comes out almost clean. (Or just follow the directions on the back of the box which pretty much said the same thing.) Cool completely, about 1 hour.

In medium bowl, beat filling ingredients with electric mixer on medium speed until smooth. Spread mixture evenly over brownie base.

In small microwavable bowl, microwave chocolate chips and butter uncovered on high for 30 to 45 seconds; stir until smooth. Spread over filling. Refrigerate about 30 minutes or until set. Cut into small squares. The original recipe says to cover & store in refrigerator, but I like mine softer so I take a couple out of the fridge to warm up before I devour them.

I can only have one of them at a time (with a big glass of milk) because they are so sweet. This is definitely a treat to be shared with your neighbors!

Sunday, March 6, 2011

Fiesta Chicken

I got this recipe off of a Reynolds Oven Bag Cooking Guide insert. It is one of our family's favorites!
1 Reynolds Oven Bag - Large Size
2 tablespoons flour
1 can (10 oz.) diced tomatoes with green chilies
2 tsp. chopped canned or fresh jalapeno pepper (optional)
6 chicken pieces
Seasoned salt
1 can (15 oz.) black beans, rinsed and drained
1 medium yellow or red bell pepper, cut in large chunks
Hot cooked rice

Preheat oven to 350 degrees. Shake flour in Oven Bag. Place bag in 13x9x2-inch baking pan with opening towards west side of pan. (Oddly specific, right?)

Add tomatoes and jalapeno, if desired, to oven bag; squeeze bag to blend in flour. Sprinkle chicken with seasoned salt; add to bag in an even layer. Arrange beans and yellow or red pepper around chicken.

Close oven bag with nylon tie. Cut six 1/2-inch slits in top of bag; tuck ends of bag in pan.

Bake 45 to 50 minutes until meat thermometer reaches 180 degrees. Serve over hot rice if desired.


The picture on the oven bag insert showed that they used bone in chicken legs and thighs. I always just use chicken breast tenderloins. Then I cut the cooking time to 35-40 minutes. When we don't have jalapenos, I just sprinkle a little bit of chili powder in to give it a little bit of heat. I also prefer red pepper over yellow pepper, but both are good. This recipe is definitely a keeper!

Friday, March 4, 2011

chocolate macadamia-nut tart

Martha Stewart is amazing and so are her recipes. Someday I want to be just like her.....well, sort of.
-
My Tyler had a birthday this week and he decided that a birthday cake was too boring for his ten year old self. So, I brought down some of my favorite recipe books and this is what he picked. It's from a cookbook that my brothers bought me when I was like 15. I have always been fascinated by her food. This tart did not disappoint us. However, we did wish we had some vanilla ice cream to go with it. Next time.
-
-
First you have to make a Pate Sucree - which is a Martha word for pie crust.
-
ingredients:
1 1/4 cups all-purpose flour
1 1/2 tablespoons sugar
1/2 cup unsalted butter, chilled and cut into small pieces
1 large egg yolk
-
In a bowl, combine flour and sugar. Cut butter in with a pastry cutter until mixture resembles coarse meal.
In a small bowl, lightly beat egg yolk with 1/4 cup ice water. Add to butter/flour mixture and stir it up. To test, squeeze a small amount of dough together. If it is crumbly, add more ice water, 1 tablespoon at a time.
Make the dough into a ball. Flatten dough into a disk and wrap with plastic wrap. Refrigerate for at least an hour.
-
Now lets make the filling.
-
ingredients:
2 large eggs
1 cup sugar
1/2 tablespoon vanilla
1/2 cup flour
1/4 teaspoon salt
3/4 cup unsalted butter, melted and cooled
6 ounces semi-sweet chocolate, chopped
2 1/2 cups (10 1/2 ounces) unsalted whole macadamia nuts
-
On a lightly floured surface, roll the dough into a 14-inch circle. Fit dough into an 11-inch tart pan with removable bottom. Trim dough evenly along edge of pan; use the remaining trimmings to patch any thin spots. Chill for 30 minutes.
-
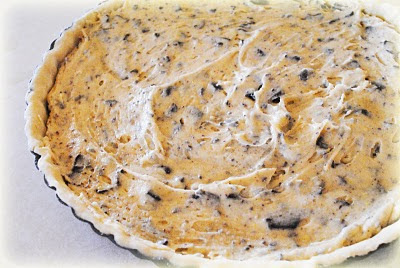
Preheat oven to 400 degrees. In a large bowl, whisk together eggs, sugar, and vanilla. Add flour and salt, then the butter. Stir in the chocolate. Pour into the chilled tart shell.
-
Make sure you lick the spoon when done....it taste so much like cookies and cream ice cream!
-
-
Cover the top with nuts, pressing them halfway into the filling.
-
-
Bake for 10 minutes. Reduce temperature to 350 degrees; continue baking until crust and nuts brown, about 30-35 minutes. Transfer to a wire rack to cool. Serve at room temperature. This recipe is better baked several hours in advance.
-
-
Happy birthday Tyler!