Tuesday, March 22, 2011

Peanut Butter Truffle Brownies

These should be made with a warning, because they are fattening, unhealthy, so rich & soooo delicious! A lady in our ward brought us a plate of them & I had to get the recipe! Hers were so much prettier than mine (all of her layers were smooth & even), but I guess that comes with practice!

Brownie Base
1 box Betty Crocker Original Supreme brownie mix (this is the kind I used, but I think any boxed chewy brownie mix would work just fine).
water, vegetable oil and eggs called for on brownie mix

Filling
1/2 cup butter (yes it says a half cup of butter just for the filling)
1/2 cup creammy peanut butter
2 cups powdered sugar
2 teaspoons milk

Topping
1/4 cup semisweet chocolate chips (I used milk chocolate chips because we are not semisweet at our house. Whatever floats your boat!)
1/4 cup butter (why yes that does say another one-fourth a cup butter just for the topping! Go big or go home!)

Heat oven to 350 degrees. Grease bottom only of 13x9-inch pan with cooking spray or shortening. (I lined my pan with aluminum foil & sprayed the bottom of it. It made it easier at the end to cut the brownies because I just lifted them right out of the pan and I didn't have to wash the pan!)
In medium bowl, stir brownie mix, pouch of chocolate syrup, water, oil and eggs until well blended. Spread in pan. Bake 28 to 30 minutes or until toothpick inserted 2 inches from side of pan comes out almost clean. (Or just follow the directions on the back of the box which pretty much said the same thing.) Cool completely, about 1 hour.

In medium bowl, beat filling ingredients with electric mixer on medium speed until smooth. Spread mixture evenly over brownie base.

In small microwavable bowl, microwave chocolate chips and butter uncovered on high for 30 to 45 seconds; stir until smooth. Spread over filling. Refrigerate about 30 minutes or until set. Cut into small squares. The original recipe says to cover & store in refrigerator, but I like mine softer so I take a couple out of the fridge to warm up before I devour them.

I can only have one of them at a time (with a big glass of milk) because they are so sweet. This is definitely a treat to be shared with your neighbors!

Sunday, March 6, 2011

Fiesta Chicken

I got this recipe off of a Reynolds Oven Bag Cooking Guide insert. It is one of our family's favorites!
1 Reynolds Oven Bag - Large Size
2 tablespoons flour
1 can (10 oz.) diced tomatoes with green chilies
2 tsp. chopped canned or fresh jalapeno pepper (optional)
6 chicken pieces
Seasoned salt
1 can (15 oz.) black beans, rinsed and drained
1 medium yellow or red bell pepper, cut in large chunks
Hot cooked rice

Preheat oven to 350 degrees. Shake flour in Oven Bag. Place bag in 13x9x2-inch baking pan with opening towards west side of pan. (Oddly specific, right?)

Add tomatoes and jalapeno, if desired, to oven bag; squeeze bag to blend in flour. Sprinkle chicken with seasoned salt; add to bag in an even layer. Arrange beans and yellow or red pepper around chicken.

Close oven bag with nylon tie. Cut six 1/2-inch slits in top of bag; tuck ends of bag in pan.

Bake 45 to 50 minutes until meat thermometer reaches 180 degrees. Serve over hot rice if desired.


The picture on the oven bag insert showed that they used bone in chicken legs and thighs. I always just use chicken breast tenderloins. Then I cut the cooking time to 35-40 minutes. When we don't have jalapenos, I just sprinkle a little bit of chili powder in to give it a little bit of heat. I also prefer red pepper over yellow pepper, but both are good. This recipe is definitely a keeper!

Friday, March 4, 2011

chocolate macadamia-nut tart

Martha Stewart is amazing and so are her recipes. Someday I want to be just like her.....well, sort of.
-
My Tyler had a birthday this week and he decided that a birthday cake was too boring for his ten year old self. So, I brought down some of my favorite recipe books and this is what he picked. It's from a cookbook that my brothers bought me when I was like 15. I have always been fascinated by her food. This tart did not disappoint us. However, we did wish we had some vanilla ice cream to go with it. Next time.
-
-
First you have to make a Pate Sucree - which is a Martha word for pie crust.
-
ingredients:
1 1/4 cups all-purpose flour
1 1/2 tablespoons sugar
1/2 cup unsalted butter, chilled and cut into small pieces
1 large egg yolk
-
In a bowl, combine flour and sugar. Cut butter in with a pastry cutter until mixture resembles coarse meal.
In a small bowl, lightly beat egg yolk with 1/4 cup ice water. Add to butter/flour mixture and stir it up. To test, squeeze a small amount of dough together. If it is crumbly, add more ice water, 1 tablespoon at a time.
Make the dough into a ball. Flatten dough into a disk and wrap with plastic wrap. Refrigerate for at least an hour.
-
Now lets make the filling.
-
ingredients:
2 large eggs
1 cup sugar
1/2 tablespoon vanilla
1/2 cup flour
1/4 teaspoon salt
3/4 cup unsalted butter, melted and cooled
6 ounces semi-sweet chocolate, chopped
2 1/2 cups (10 1/2 ounces) unsalted whole macadamia nuts
-
On a lightly floured surface, roll the dough into a 14-inch circle. Fit dough into an 11-inch tart pan with removable bottom. Trim dough evenly along edge of pan; use the remaining trimmings to patch any thin spots. Chill for 30 minutes.
-
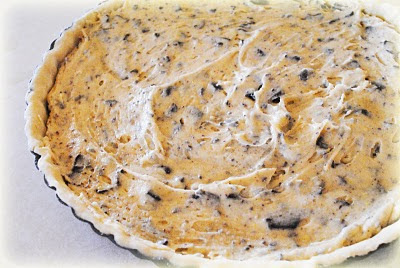
Preheat oven to 400 degrees. In a large bowl, whisk together eggs, sugar, and vanilla. Add flour and salt, then the butter. Stir in the chocolate. Pour into the chilled tart shell.
-
Make sure you lick the spoon when done....it taste so much like cookies and cream ice cream!
-
-
Cover the top with nuts, pressing them halfway into the filling.
-
-
Bake for 10 minutes. Reduce temperature to 350 degrees; continue baking until crust and nuts brown, about 30-35 minutes. Transfer to a wire rack to cool. Serve at room temperature. This recipe is better baked several hours in advance.
-
-
Happy birthday Tyler!